Salesforce Summer ’13 pre-release available

Here you go, yet another release from Salesforce (Summer ’13 is around the corner)Image

  • Quantity forecasting is available now with collaborative forecasting
  • Introducing Actions to create records from chatter feed
  • Introduced My Profile and My settings (brand new layout) without navigating to setup
  • Idea Comments as exposed to write new triggers and validation rules
  • Changed the order of admin setup to
    • Administer
    • Build
    • Deploy
    • Monitor

Make sure you signup for pre-release to get to know more

Here is latest release notes from salesforce

Posted in salesforce, Uncategorized | Tagged , , | 13 Comments

Summer’13 – New Developer Console

Today we got a sneak preview of new developer console (Summer’13), which looks promising and here are some features of new console

  • Code completion
  • Run Tests
  • Fixes to the chrome issues
  • Improved code coverage
  • New UI

Here is the quick screenshot from the webinarImageCan’t wait further to get hands on Summer’13


Posted in Uncategorized | Tagged , , | Leave a comment

Spring 13 release notes

Here are some highlights of Spring’13

  • User-Focused help
  • Dependent picklists works in all browsers
  • Ability to add tasks in chatter
  • Connect in Apex – Chatter objects are exposed as REST API
  • Salesforce for outlook side panel is available now
  • Dashboards for Touch
  • You can play with Chatter answers now in your developer environment
  • Connected apps are available now
  • TimeZone class is available now
  • State and Country picklists


You can sign up for Pre-release preview here

You can review the maintenance window here

Posted in Uncategorized | Tagged , , | 1 Comment

Salesforce Summer’12 release notes

Salesforce is getting ready with Summer’12 release notes, are you ready?

Here are the pre-release notes, seems to be it takes couple more days to get the full release notes

Updated Summer’12 Release Notes

Signup for Pre-release

Here are some quick highlights as of today

  • Chatter files are included in data export and the file size has been increased from 128MB to 512 MB
  • Desktop Notifications for Incoming Chats in Live Agent
  • Custom App Components for the Service Cloud Console
  • Customize a Flow’s User Interface with Visualforce
  • Enable SMS-based Identity Confirmation
  • Separate Organization-Wide Defaults for External Users (Pilot)
  • SOQL OFFSET—GA
  • Allow Reparenting Option in Master-Detail Relationship Definitions
  • New Object Limits Page for Standard & Custom Objects

Here are the sandbox preview instructions for Summer’12

Posted in Apex, salesforce, Salesforce Tips & Tricks, Uncategorized | Tagged , , , | 59 Comments

Syncing quotes using Apex

Wondering how to sync quote with an opportunity using Apex? Did you tried updating the “IsSyncing” field and it showed an error saying field is not writable? If yes then here is the solution for you. At the Opportunity level you have a field named as “SyncedQuoteId” and if you update this field with the desired quote id, then salesforce automatically sync this quote with opportunity.

Opportunity.SyncedQuoteId = (desired) Quote.id;
update opportunity;

In the same way do you wanna sync your custom fields for quote and quote line item then here is the application from appexchange

Managed package

Unmanaged package

Happy Quoting !!!

Posted in Apex, salesforce, Salesforce Tips & Tricks, Uncategorized | Tagged , , , | 3 Comments

First look at next generation data loader by Jitterbit

Jitterbit is a leader in the integration of on-premise as well as cloud. They built a next generation data loader and which works excellent and the UI is fantastic!!!

Here is the installer for pre-release data loader

http://www.jitterbit.com/salesforce/data-loader

Some helpful guides for this data loader

http://www.jitterbit.com/Files/Product/JitterbitDataLoaderDatasheet.pdf

http://www.jitterbit.com/Files/Product/JitterbitDataLoadervsIntegrationComparison.pdf

Finally here is the community which helps you for any issues

https://getsatisfaction.com/dataloader

Here are some training videos

Try the new data loader and share your feedback

Here is a quick preview

Jitterbit Data Loader

Posted in salesforce, Salesforce Tips & Tricks, Uncategorized | 6 Comments

Salesforce clone utility class

Do you ever wonder to clone an object, if yes then I have an utility which works for every object. 

Public class MyCloneClass{
    //Pass the parameters as 1. Parent Object API Name, 2. Source record id, 3. API Name of the related field, 4. Child Object API Name
	Public static Sobject myCloneMethod(String objName, String recId, String parentFieldApiName, String childObjName){
        string qryStr = prepareQuery(objName, 'Id', recId);
        Sobject sobj = database.query(qryStr);
        Sobject clonedSObj = sobj.clone(false, true);
        insert clonedSObj;
        if(childObjName != null && parentFieldApiName != null){
            string childQry = prepareQuery(childObjName, parentFieldApiName, recId);
            List<Sobject> sobjList = database.query(childQry);
            List<Sobject> clonedSobjList = sobjList.deepClone(false);
            for(Sobject s : clonedSobjList)
                s.put(parentFieldApiName, clonedSObj.id);//Changing the parent id
            insert clonedSobjList;
        }
        return clonedSObj;
    }
    //This method is used to prepare the desired query string by passing the objectname and where clause condition
    private static String prepareQuery(String sobjName, String fieldName, String recId){
        Map<String, Schema.SObjectField> fieldsMap = Schema.getGlobalDescribe().get(sobjName.toLowerCase()).getDescribe().Fields.getMap();
        String fields = '';
        for(Schema.SObjectField sf : fieldsMap.values()) {
            Schema.DescribeFieldResult fr = sf.getDescribe();
            if(fr.isCreateable())
                fields += fr.getName()+',';
        }
        if(fields.endsWith(','))
            fields = fields.substring(0,fields.lastIndexOf(','));
        String qryString = 'Select ' +fields+' from '+sobjName+' where '+fieldName+' = \''+recId+'\'';
        return qryString;
    }
}

Usage of this code:

//To clone a single account
MyCloneClass.myCloneMethod(Account, '001U0000003NoYY', null, null);
//To clone a account and their related contacts
MyCloneClass.myCloneMethod(Account, '001U0000003NoYY', 'AccountId', Contact);

You can call this class from a custom button/visualforce page/apex class. Happy coding…

Posted in Apex, salesforce, Salesforce Tips & Tricks, Visualforce | Tagged , , , | 1 Comment

Displaying a grid in Salesforce with the help of ExtJS

As ExtJS growing rapidly in a javascript world, you might wanted to embed these features in your salesforce instance(s). Are you excited to learn something with ExtJS, then here is the blog on how to get started with ExtJS.

This is a simple blog post which describes about how to display an ExtJS grid in salesforce.

Image

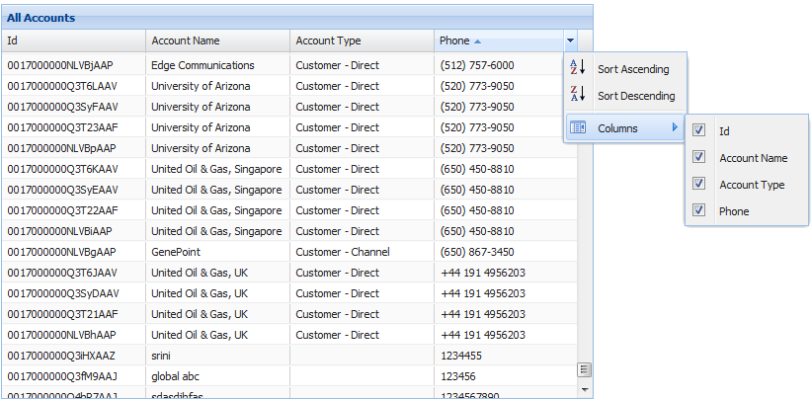
Here is the page code for above example:

    <apex:page controller="myExtjs1">
    //These statements are used to insert the required ExtJS script and their related CSS
	<script type="text/javascript" charset="utf-8" src="http://cdn.sencha.io/ext-4.0.7-gpl/ext-all.js"></script>
    <link rel="stylesheet" type="text/css" href="http://cdn.sencha.io/ext-4.0.7-gpl/resources/css/ext-all.css" />
    <apex:form >
        <div id="gridSpace"></div> //This is the div tag which renders our extjs component
    </apex:form>

    <script type="text/javascript" >
	    Ext.ns("Ext.Srini"); //Defining a namespace is best practice in ExtJS
	    Ext.onReady(function(){ //This is a execution point
		    var srinipanel = new Ext.create('Ext.Srini.srinipanel', {   //This is to create our custom panel
		            renderTo: gridSpace,
		            title : 'All Accounts'
		        });
	
	        myExtjs1.getAllAccounts(function(result, er){ //This method is used to call our controller method
						                var res = Ext.decode(result);
						                store.loadData(res.Records);
	            					}, {escape:false});
   		});
   		
   		Ext.define('AccountModel', { //Defining a model, which is like an object
	        extend	: 'Ext.data.Model',
	        fields	: [
			            {name: 'Id', type: 'string'},
			            {name: 'Name', type: 'string'},
			            {name: 'Phone', type: 'string'},
			            {name: 'Type', type: 'string'}
	    			  ]
	    });
	    
		var store = Ext.create('Ext.data.Store', { //Create a store, which is like collection of records with sorting and grouping capability
	                        model 		: 'AccountModel', //Associate your store with Model
	                        proxy 		: {
				                            type 	: 'memory',
				                            reader	: {
			                                	type : 'json',
				                          	}
	                       				  }
	                    });
	    
	    Ext.define('Ext.Srini.srinipanel', { //Defining a panel in order to display our data
	        extend		: 'Ext.grid.Panel',
	        alias 		: 'widget.srinipanel',
	        name 		: 'srinipanel',
	        columnLines : true,
	        autoScroll	: true,
	        singleSelect: true,
	        selType		: 'cellmodel',
	        border		: true,
	        height		: 400,
	        width		: 600,
	        store		: store, //Associate with our store
	        columns 	: [ //Define the required columns
		                    {
		                        text 		: 'Id',
		                        dataIndex	: 'Id',
		                        flex		: 0.3
		                    },
		                    {
		                        text 		: 'Account Name',
		                        dataIndex 	: 'Name',
		                        flex 		: 0.3
		                    },
		                    {
		                        text 		: 'Account Type',
		                        dataIndex 	: 'Type',
		                        flex 		: 0.3
		                    },
		                    {
		                        text 		: 'Phone',
		                        dataIndex 	: 'Phone',
		                        flex 		: 0.3
		                    }
		            	],
		});
    </script>
</apex:page>

Here is the controller code:

global class myExtjs1 {
    @RemoteAction
    global static String getAllAccounts() //Need to define as a remote action as we will be calling this through javascript
    {
        List<Account> accounts = [SELECT Id, Name, Type, Phone FROM Account];
        String JSONString = JSON.serialize(accounts);//This is how we can serailize our response into JSON format
        return '{\"Records\":' +JSONString+', \"error\": \"null\", \"status\":\"SUCCESS\", \"count\":\"' + accounts.size() + '\" }';
    }
}

Let me know if you have any questions to get started and have a happy coding 🙂

Posted in Apex, salesforce, Salesforce Tips & Tricks, Visualforce | Tagged , | 15 Comments

Salesforce Utility Methods

Here are some of the utility methods, which we will be using very frequently in our salesforce world.

//This utility takes the input as List<sobjects> and the desired field name, which inturn returns the unique values of the specified field names
public static Set<String> pickDesiredSet(List<SObject> sobjects, String fName){
	Set<String> strSet = new Set<String>();
		if(sobjects != null && sobjects.size() > 0 && fName != null && fName.trim() != null) 
			for(SObject sobj : sobjects)
					strSet.add(String.valueOf(sobj.get(fName)));
	return strSet;
}
//This utility takes the input as List<sobjects>, key and pair, which inturn returns the key and pair as a map
public static Map<String, String> pickDesiredMap(List<SObject> sobjects, String key, String pair){
	Map<String, String> strMap = new Map<String, String>();
		if(sobjects != null && sobjects.size() > 0 && key != null && key.trim() != null) 
			for(SObject sobj : sobjects)
				if(!strMap.containsKey(key)) //To keep only the first value
					strMap.put(String.valueOf(sobj.get(key)), String.valueOf(sobj.get(pair)));
	return strMap;
}

Any addons to these methods are highly appreciated.

Posted in Apex, salesforce, Salesforce Tips & Tricks, Visualforce | 1 Comment

Pagination using standardsetcontroller

As the number of records increases, the time required for the browser to render them increases. Paging is used to reduce the amount of data exchanged with the client. Paging is typically handled on the server side (standardsetcontroller). The page sends parameters to the controller, which the controller needs to interpret and then respond with the appropriate data set.


Here is the controller which makes use of standard set controller for pagination

public with sharing class Pagination {
    Public Integer noOfRecords{get; set;}
    Public Integer size{get;set;}
    public ApexPages.StandardSetController setCon {
        get{
            if(setCon == null){
                size = 10;
                string queryString = 'Select Name, Type, BillingCity, BillingState, BillingCountry from Account order by Name';
                setCon = new ApexPages.StandardSetController(Database.getQueryLocator(queryString));
                setCon.setPageSize(size);
                noOfRecords = setCon.getResultSize();
            }
            return setCon;
        }set;
    }
    
    Public List<Account> getAccounts(){
        List<Account> accList = new List<Account>();
        for(Account a : (List<Account>)setCon.getRecords())
            accList.add(a);
        return accList;
    }
    
    public pageReference refresh() {
        setCon = null;
        getAccounts();
        setCon.setPageNumber(1);
        return null;
    }
    
    public Boolean hasNext {
        get {
            return setCon.getHasNext();
        }
        set;
    }
    public Boolean hasPrevious {
        get {
            return setCon.getHasPrevious();
        }
        set;
    }
 
    public Integer pageNumber {
        get {
            return setCon.getPageNumber();
        }
        set;
    }
 
    public void first() {
        setCon.first();
    }
 
    public void last() {
        setCon.last();
    }
 
    public void previous() {
        setCon.previous();
    }
 
    public void next() {
        setCon.next();
    }
}

Using the above controller methods we can define the pagination.

<apex:page controller="Pagination">
    <apex:form >
        <apex:pageBlock id="pb">
            <apex:pageBlockTable value="{!Accounts}" var="a">
                <apex:column value="{!a.Name}"/>
                <apex:column value="{!a.Type}"/>
                <apex:column value="{!a.BillingCity}"/>
                <apex:column value="{!a.BillingState}"/>
                <apex:column value="{!a.BillingCountry}"/>
            </apex:pageBlockTable>
            <apex:panelGrid columns="7">
                <apex:commandButton status="fetchStatus" reRender="pb" value="|<" action="{!first}" disabled="{!!hasPrevious}" title="First Page"/>
                <apex:commandButton status="fetchStatus" reRender="pb" value="<" action="{!previous}" disabled="{!!hasPrevious}" title="Previous Page"/>
                <apex:commandButton status="fetchStatus" reRender="pb" value=">" action="{!next}" disabled="{!!hasNext}" title="Next Page"/>
                <apex:commandButton status="fetchStatus" reRender="pb" value=">|" action="{!last}" disabled="{!!hasNext}" title="Last Page"/>
                <apex:outputText >{!(pageNumber * size)+1-size}-{!IF((pageNumber * size)>noOfRecords, noOfRecords,(pageNumber * size))} of {!noOfRecords}</apex:outputText>
                <apex:commandButton status="fetchStatus" reRender="pb" value="Refresh" action="{!refresh}" title="Refresh Page"/>
                <apex:outputPanel style="color:#4AA02C;font-weight:bold">
                    <apex:actionStatus id="fetchStatus" startText="Fetching..." stopText=""/>
                </apex:outputPanel>
            </apex:panelGrid>
        </apex:pageBlock>
    </apex:form>
</apex:page>

Do you really feel the code is little larger then what you expect, here is the minified version of controller and page
Controller Code:

public with sharing class Pagination_min {
    Public Integer noOfRecords{get; set;}
    Public Integer size{get;set;}
    public ApexPages.StandardSetController setCon {
        get{
            if(setCon == null){
                size = 10;
                string queryString = 'Select Name, Type, BillingCity, BillingState, BillingCountry from Account order by Name';
                setCon = new ApexPages.StandardSetController(Database.getQueryLocator(queryString));
                setCon.setPageSize(size);
                noOfRecords = setCon.getResultSize();
            }
            return setCon;
        }set;
    }
    
    Public List<Account> getAccounts(){
        List<Account> accList = new List<Account>();
        for(Account a : (List<Account>)setCon.getRecords())
            accList.add(a);
        return accList;
    }
    
    public pageReference refresh() {
        setCon = null;
        getAccounts();
        setCon.setPageNumber(1);
        return null;
    }
}

Page Code:

<apex:page controller="Pagination_min">
    <apex:form >
        <apex:pageBlock id="pb">
            <apex:pageBlockTable value="{!Accounts}" var="a">
                <apex:column value="{!a.Name}"/>
                <apex:column value="{!a.Type}"/>
                <apex:column value="{!a.BillingCity}"/>
                <apex:column value="{!a.BillingState}"/>
                <apex:column value="{!a.BillingCountry}"/>
            </apex:pageBlockTable>
            <apex:panelGrid columns="7">
                <apex:commandButton status="fetchStatus" reRender="pb" value="|<" action="{!setCon.first}" disabled="{!!setCon.hasPrevious}" title="First Page"/>
                <apex:commandButton status="fetchStatus" reRender="pb" value="<" action="{!setCon.previous}" disabled="{!!setCon.hasPrevious}" title="Previous Page"/>
                <apex:commandButton status="fetchStatus" reRender="pb" value=">" action="{!setCon.next}" disabled="{!!setCon.hasNext}" title="Next Page"/>
                <apex:commandButton status="fetchStatus" reRender="pb" value=">|" action="{!setCon.last}" disabled="{!!setCon.hasNext}" title="Last Page"/>
                <apex:outputText >{!(setCon.pageNumber * size)+1-size}-{!IF((setCon.pageNumber * size)>noOfRecords, noOfRecords,(setCon.pageNumber * size))} of {!noOfRecords}</apex:outputText>
                <apex:commandButton status="fetchStatus" reRender="pb" value="Refresh" action="{!refresh}" title="Refresh Page"/>
                <apex:outputPanel style="color:#4AA02C;font-weight:bold">
                    <apex:actionStatus id="fetchStatus" startText="Fetching..." stopText=""/>
                </apex:outputPanel>
            </apex:panelGrid>
        </apex:pageBlock>
    </apex:form>
</apex:page>
Posted in Apex, salesforce, Salesforce Tips & Tricks, Uncategorized, Visualforce | Tagged | 34 Comments